Wednesday, March 13, 2013

Old Reynella Historicon Festival

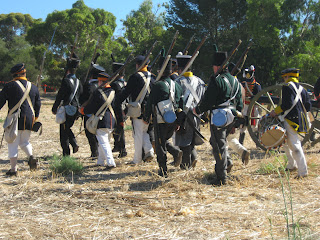
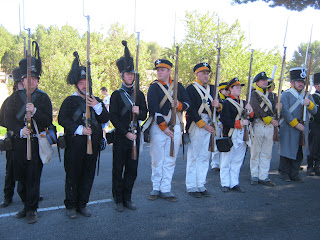
Last weekend was an amazing weekend as South Australia hosted its first military living history festival. In attendance were vikings, medieval, Napoleonic forces (including the 15th Light Dragoons, Dutch infantry, 95th Rifles, Prussian infantry, Brunswicker's, French Infantry, British and French Artillery and others), 1860s Noarlunga Volunteer Rifles, 1880s Fort Glanville Artillery, World War I and World War II forces. There were encampments scattered around the township and a block of land on the main street that hosted battles throughout the weekend.

For us it was wonderful to finally catch up with our fellow members of La Belle Alliance. Unfortunately, due to work and study commitments we have been unable to attend events for 3 years. This is not helped by the fact that LBA is located in Queensland and we live in South Australia. They are a wonderful group and we really enjoyed catching up with them. The weekend had a few glitches, but these are to be expected for an inaugural event. Thankfully, the groups managed to survive the 37+ degree Celsius heat, lack of toilet and shower facilities and missing water supplies. The battles, however, were great fun and visually appealing.

We are definitely looking forward to next year and hope that it will get bigger and better.

 We were fortunate that one of the groups brought a fully working Napoleonic kitchen.
ps. that is me on dishes duty
 This was the main street of our encampment. Our tent was on the next street to the left.
 Marching on to the field.
 The Brunswicker's advancing on the French. 
Nic is the one kneeling to load on the left.
 The French from LBA and the dragoons on display for a local MP.
 The Brunswicker's from LBA, the Dutch and Prussian infantry also on display.
Nic and myself after the final battle on Sunday.

Unfortunately, we are dressed from different decades.... sadly no one else seemed to pick up on this fact. Nic is dressed in the later 1810-15 uniform, while I was in 1790-1800s. I wish I had a photo of the back as my jump/corset is actually high at the back providing an interesting transitional look. I really love my new outfit. It was not overly uncomfortable in the heat and was highly functional when working and running round the battle field to provide water to the fallen troops.

Michael was also nice enough to find this Youtube online of the battle. Nic is the Brunswicker who got his horse hair plume stuck on his musket. I hope you enjoy as much as we did


Tuesday, March 5, 2013

Napoleonic Impression - 1800 Working Skirt

In working on my Napoleonic Impression I decided to make a thick linen work skirt. I was given some thick linen by a friend that was an aqua colour. It was the perfect amount for a skirt and coloured easily into a lovely medium blue. This was a very easy design to make after learning to make shifts. There are many great photo tutorials for 18th century skirts. Some that I used for reference include how to's by -

A Fashionable Frolic and
American Duchess

To make it more useful for turn of the century events it can be tied at the waist in late 18th century style or raised to a higher early 19th century silhouette with the use of shoulder straps that tie up in the front. I really also like the raised up height as it will help keep my skirts dry when camping in winter.

The completed skirt

shoulder straps

Well I am now closer to a finished early Napoleonic impression. I also managed to trim a new sun hat for the event on the weekend.

Still to Do's
To complete this outfit I still need to finish hand sewing my petticoat, finish my cap and make a plaid scarf for my neck.

For my later Napoleonic impression I still have to make my short gown and a new short stay/ transitional under corset.

The Challenge 5# Peasants & Pioneers
Fabric: Blue Linen
Pattern: None
Year: ca. 1800
Notions: white cotton tape, natural cotton tape
How historically accurate is it? I believe that this is accurate.
Hours to complete: about 5 hours
First worn: Today to take the completed photos
Total cost: None as everything came out of my fabric and left over stash

1790s Jumps/Transitional Stays

In researching my early turn of the century Napoleonic impression, I came across this Jump in the V&A museum. It is dated 1790-95. In the V&A Undergarment book it provides a lot more information including how stays like this are useful as decorative outer wear as well as a functional/practical undergarment.


I loved the look of this transitional corset and decided to try and copy it. I was also very proud as in undertaking this project I had my first attempt at dying fabric. The cotton sateen was a cream colour to begin with. I ended up making two batches of fabric to get the colour right.

 This photo actually distorts the colour.

The toile, I had to actually draw the boning channels onto it to get it lined up correctly.

I was really excited to complete this process completely correctly (or as correctly as I could). Therefore, it is completely hand sewn.  The only part that is incorrect is the boning. As I can not use real whale bone, I chose to use some spiral boning for the 8 bones. These were wider than the original bones, which resulted in the widths of my channels being wider. I am not overly concerned about this as I still thing that it looks amazing on. I also found that it is very comfortable as well. I found the visible stitching very challenging and I look forward to undertaking more projects with decoration and maybe even some embroidery in the future.


The eyelet holes were made using a belt hole punch and then was embroidered using a blanket stitch. I copied this detail from the V&A undergarment book, which has close up photos. The offset coloured holes look really nice and are also very useful in lacing up the corset.

 The tape is also stitched down using a green top stitch, which is a really nice subtle detail.

From the photos I was able to see that on the center back of the corset had stitches running vertically behind the crosses. I decided to keep this in decorating all of the cross sections. It really helps to strengthen and reinforce next to the boning.


 I did not have any details of the colours of the stitches in the back so I created my own colour combination for the cross stitching on the back and shoulders.


The Challenge 4# Embellish
Fabric: Cotton Sateen, White Cotton Lining

Pattern: None - drafted using squares and triangle layouts
Year: ca. 1790

Notions: Pink Cotton Twill Tape, Cotton Embroidery Thread, White Cotton Corset String

How historically accurate is it? I believe that this is accurate, minus using spiral boning

Hours to complete: about 40 hours (I had to unpick the visible stitches multiple times)
First worn: today to take the completed photos

Total cost: $4 for Thread, $9 for Corset String,  approx. $15 Spiral Boning, $8 for Twill Tape, $16 for Dyes and fabric from my stash

Late 18th Century Shift.. and Introductions

I know I am posting this very late, but I did have it completed on time, along with all the other challenges. The reason for the late posts has been my lack of photos. Thankfully, my friend Jessie was kind enough to take a few today so that I can post them up.

Unfortunately, my personal photographer and husband, Nic, has been away for the last 4 weeks. I guess that now is as good a time as any to introduce ourselves better. Nic is a doctor of Archaeology. He specialises in Australian Frontier Conflict and Indigenous Heritage. I am very proud of him. Unfortunately, it means that he works away from home at lot. At this current time he is working in Launceston, Tasmania. The team he is a part of are excavating an 1830s settlement. I am really looking forward to seeing his photos of the dig and the amazing 1830s finds.

As for myself, I am currently undertaking a Research based Honours Program as a part of the final year of my degree (Bachelor of Education, Junior Primary and Primary). I started university last week and I believe that this will be a very full on year for study. This means I have had to put many projects and events for the upcoming year on hold. Thankfully, I have been able to cram a lot of sewing into the last few weeks, in preparation for the Reynella History Event, in South Australia.  This is the first Living History Event being held in our state, so we are very excited.

Anyways, back to my sewing. In order to finally create my turn of the century working class/private wife's impression, the first thing I required was a shift. I wanted to attempt a squares and triangles layout, but I must admit that it at first seemed overwhelming and scary. Thankfully, there are many wonderful websites that helped in construction and historical changes in styles.

18th Century Shifts
Making an 18th Century Shift
How to Make an 18th Century Chemise

I was also very lucky in having a friend, who supplied me with this wonderful "Dodgy" drawing of different cutting layouts.
Based on the information from these resources and books in my library I decided to make my shift thin with long triangles up to the underarms. I also went with thin arms that gather into a band under the elbow that can also be raised above the elbow and tied when working. I also decided to fold over the fabric to make the drawstring on the neck. I was surprised at how easy it was to make the string casing without using bias tape. I learnt a lot in creating this shift and I am very happy with the results. It is very comfortable.

The finished shift, not very flattering unfortunately.

The sleeve detail.

The Challenge 3# Under It All
Fabric: White Linen

Pattern: None - drafted using squares and triangle layouts
Year: ca. 1800

Notions: white cotton tape

How historically accurate is it? I believe that this is accurate. I even 100% hand sewed it, a first for me

Hours to complete: about 28 hours
First worn: today to take the completed photos

Total cost: I believe that the cotton tape was about $8 and the linen was about $40.